
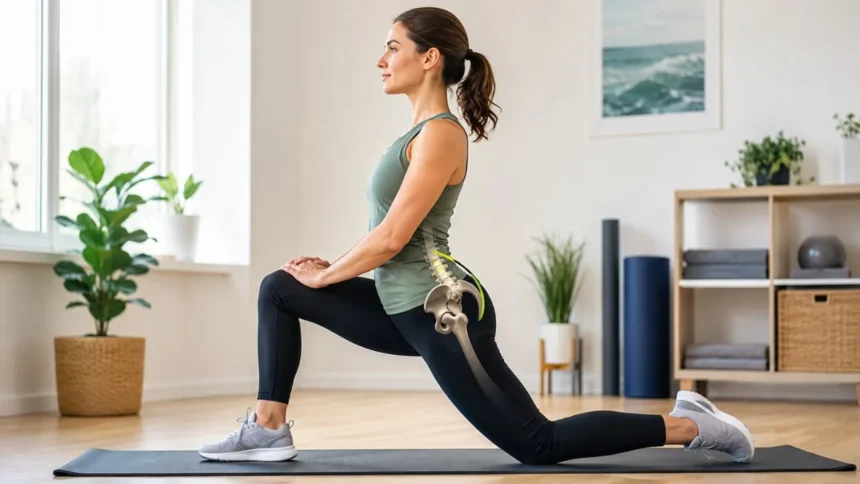
How to Fix Anterior Pelvic Tilt: Exercises, Stretches, and Posture Tips
Anterior pelvic tilt describes a position in which the front of the pelvis rotates slightly downwards while the back rotates upwards. This position can make the lower back appear more arched and the stomach or buttocks look more prominent. It is common, and the appearance alone does not necessarily mean anything is wrong.
Many online guides describe anterior pelvic tilt as a strict muscle imbalance caused by tight hip flexors, weak abdominal muscles and inactive glutes. These factors can influence pelvic position in some people, but the explanation is often more complicated. Bone structure, movement habits, training, pregnancy, body shape and natural anatomical differences can all affect posture.
You may not need to “fix” anterior pelvic tilt when it causes no pain, weakness or movement restriction. The pelvis is meant to move forwards and backwards during walking, lifting and exercise. Trying to hold it in a rigidly tucked position throughout the day may create unnecessary tension rather than improving your health.
When anterior pelvic tilt accompanies lower-back discomfort, hip tightness or poor movement control, a balanced exercise programme may help. The aim should be to improve strength, mobility and control rather than chase a perfect angle. This guide explains how to build those qualities safely and progressively.
The Quick Answer: How Do You Fix Anterior Pelvic Tilt?
Start by learning how to move your pelvis between a gentle forward tilt, backward tilt and comfortable middle position. This awareness helps you recognise when you are excessively arching your lower back during standing, lifting or exercise. It does not require holding your back completely flat throughout the day.
Next, strengthen the muscles that help control the hips, pelvis and trunk. Glute bridges, dead bugs, controlled squats, split squats and side planks are useful options when performed correctly. The exercises should improve movement capacity rather than simply make individual muscles feel tired.
Mobility work may also help when the front of your hips feels restricted or you struggle to extend the hip without arching your lower back. A gentle hip flexor stretch can be included, but stretching alone rarely creates lasting change. New mobility needs to be supported with strength and controlled movement.
Practise consistently for several weeks and monitor comfort, function and exercise technique. You may notice improved control before seeing a visible postural change. When pain is severe, persistent or accompanied by neurological symptoms, seek professional assessment instead of assuming pelvic tilt is the cause.
What Is Anterior Pelvic Tilt?
The pelvis is a ring of bones connecting the spine to the hips and lower limbs. It can rotate forwards, rotate backwards, shift sideways and move differently during ordinary activities. Anterior pelvic tilt is simply the name given to forward rotation of the pelvis relative to the upper body and thighs.
As the pelvis rotates forwards, the natural inward curve of the lumbar spine may become more noticeable. This can create the appearance of an exaggerated lower-back arch. However, pelvic shape, spinal structure and body composition can make two people with similar movement patterns look very different.
A certain amount of anterior tilt is commonly present when people stand naturally. The pelvis does not have to be perfectly level for someone to be healthy, strong or pain-free. Static posture is only one small part of how the body manages movement and physical load.
The more useful question is whether you can move comfortably in and out of the position. Someone who can control the pelvis, tolerate daily activities and exercise without symptoms may not require correction. Limited movement, persistent pain or difficulty controlling the lower back may justify a personalised programme.
Does Anterior Pelvic Tilt Really Need to Be Fixed?
Anterior pelvic tilt does not automatically need treatment when it is painless and does not limit movement. Many healthy people stand with some forward pelvic rotation and a visible lumbar curve. Treating every postural difference as a defect can create unnecessary anxiety and constant body checking.
Posture also changes throughout the day. Your pelvic position while sitting at a desk will differ from its position during walking, sprinting, lifting or relaxing. No single alignment must be maintained continuously, and the ability to change positions is often more valuable than holding one “correct” posture.
Research has not established a simple cause-and-effect relationship between standing anterior pelvic tilt and lower-back pain. People with similar postures may have completely different symptoms. Pain can be influenced by activity levels, sleep, stress, previous injuries, health conditions and sensitivity of the nervous system.
Treatment is more appropriate when you have a specific problem, such as discomfort during prolonged standing, difficulty extending the hips or excessive back arching during exercises. In that case, the objective is to improve the activity that bothers you rather than correct your appearance according to an arbitrary measurement.
What Can Contribute to an Anterior Pelvic Tilt?
Your natural anatomy has a significant influence on pelvic position. The shape of the pelvis, orientation of the hip joints and curves of the spine differ between individuals. These structural features cannot be changed through stretching, and they do not necessarily create symptoms or require correction.
Long periods of sitting may temporarily make the front of the hips feel stiff, especially when daily movement is limited. However, sitting does not permanently shorten every person’s hip flexors or automatically cause anterior pelvic tilt. The effect depends on overall activity, exercise habits and individual mobility.
Strength and movement control may contribute when someone repeatedly extends the lower back instead of using the hips. For example, the pelvis may tip forwards during a squat, overhead press or running stride when the person lacks control or uses a load that is currently too demanding.
Pregnancy, changes in body weight, high-heeled shoes and particular sports may also alter how a person balances their body. Gymnastics, dance and strength training can involve repeated lumbar extension. These activities are not inherently harmful, but varied movement and sensible load management remain important.
Common Signs Associated With Anterior Pelvic Tilt
A noticeable lower-back arch is the feature most commonly associated with anterior pelvic tilt. The front of the pelvis may appear lower than the back, while the abdomen and buttocks look more prominent. Visual appearance is subjective, however, and photographs can be affected by clothing, camera angle and stance.
Some people report tightness at the front of the hips or fatigue across the lower back after standing. Others notice that their ribs lift and their back arches during overhead movements. These symptoms may involve movement habits, but they do not prove that pelvic tilt is the sole cause.
Difficulty squeezing the glutes without extending the lower back may indicate limited hip-extension control. You might notice this during bridges, lunges, running or walking uphill. Learning to extend the hip while keeping the ribs and pelvis reasonably controlled can improve comfort and exercise technique.
Pain travelling down a leg, numbness, weakness or altered bladder and bowel function is not a normal postural issue. These symptoms may involve nerves or another medical condition. Do not attempt to manage them solely with anterior pelvic tilt exercises found online.
How to Check Your Pelvic Position at Home
Stand naturally in front of a mirror without deliberately changing your posture. Notice the position of your ribcage, lower back and pelvis, but avoid diagnosing yourself from appearance alone. A pronounced curve may reflect your normal structure rather than a correctable muscle imbalance.
Place your hands on the prominent bones at the front and back of your pelvis if you can locate them comfortably. Their relative height may provide a rough idea of pelvic orientation, but home measurement is imprecise. Small differences are common and should not be treated as proof of dysfunction.
A more useful test is pelvic movement. Lie on your back with your knees bent and feet on the floor, then gently flatten your lower back by tipping the pelvis backwards. Reverse the motion by creating a small arch, and settle around the comfortable midpoint between the two positions.
Notice whether the movement feels smooth and whether you can breathe normally. Difficulty controlling the motion may suggest that pelvic-awareness exercises could help. Pain, marked restriction or significant side-to-side differences are better assessed by a physiotherapist than interpreted through a visual self-test.
Step One: Learn the Posterior Pelvic Tilt
Lie on your back with your knees bent, feet flat and arms relaxed. Exhale gently and imagine bringing the front of your pelvis towards your ribs. Your lower back should move slightly towards the floor without your feet pushing hard or your shoulders becoming tense.
Hold the position for three to five seconds while continuing to breathe. Release slowly and return to a comfortable neutral position rather than forcing a large forward arch. Perform eight to twelve controlled repetitions and stop when the movement becomes strained or uncomfortable.
This exercise develops awareness rather than permanently locking the pelvis backwards. You can later practise the same movement while sitting, standing against a wall or moving onto your hands and knees. Each position changes the demand and helps you transfer control into daily activities.
Avoid squeezing your abdominal muscles as hard as possible or holding your breath. A forceful tuck can flatten the lumbar spine excessively and create tension in the glutes or pelvic floor. Use the smallest movement needed to feel that you are controlling the pelvis deliberately.
Step Two: Stretch the Hip Flexors Carefully
Begin in a half-kneeling position with one knee on a padded surface and the opposite foot in front. Keep your torso tall and gently tip the pelvis backwards. You should feel a mild stretch across the front of the hip on the kneeling side rather than pressure in the lower back.
Shift your body forwards slightly while maintaining the gentle pelvic position. Do not create more range by arching your back or pushing the ribs forwards. Hold the stretch for approximately twenty to thirty seconds and repeat two or three times on each side.
People often stretch aggressively because they assume their hip flexors are permanently shortened. Strong discomfort is unnecessary and may irritate sensitive tissue. A mild, controlled stretch followed by active strengthening is usually more useful than forcing the hip into an extreme position.
Hip flexor stretching is optional when you already have comfortable hip extension. More stretching is not always better, particularly for people with flexible joints or hip instability. Focus on the restriction that affects your movement rather than following a routine based only on posture.
Step Three: Strengthen Your Glutes
The glute bridge is a simple starting exercise. Lie on your back with your knees bent and feet placed comfortably apart. Gently control your ribs and pelvis, push through your feet and lift your hips without creating a large arch in the lower back.
Pause near the top and feel the buttock muscles working. Your body does not need to form an exaggerated straight line, and lifting higher is not always better. Lower slowly and complete two or three sets of eight to fifteen controlled repetitions.
Progress the exercise by using a resistance band, pausing longer or performing a bridge march. Single-leg bridges are more demanding and should be added only when you can keep the pelvis reasonably level. The goal is controlled hip extension rather than maximum height.
Squats, step-ups, Romanian deadlifts and split squats can develop the glutes through larger movements. Begin with a manageable range and load. Use the hips and legs while avoiding repeated uncontrolled extension through the lower back.
Step Four: Build Better Core Control
Core training should teach the trunk to manage movement and load rather than remain rigid throughout the day. The abdominal muscles, back muscles, diaphragm and pelvic floor work together during breathing, walking and lifting. No single exercise can isolate a perfect neutral pelvis.
A dead bug is a useful starting movement. Lie on your back with your hips and knees bent, gently control your ribcage and slowly lower one heel towards the floor. Return to the starting position and alternate sides without allowing the lower back to arch suddenly.
Begin with two sets of six to ten repetitions per side. Reduce the movement range when you cannot maintain comfortable control or normal breathing. Progress by extending the leg further, moving the opposite arm or using a light resistance band.
Side planks, bird dogs, carries and controlled plank variations can provide further progression. Choose exercises you can perform without increasing pain or creating excessive strain. Core strength develops through gradual loading, not by continuously pulling your stomach in during everyday life.
Step Five: Improve Hip Extension Control
Stand facing away from a wall with your heels a short distance in front of it. Reach your hips backwards until your buttocks lightly touch the wall while keeping your spine comfortable. This hip-hinge drill teaches you to move through the hips without unnecessarily arching or rounding the lower back.
Move the feet farther from the wall as the pattern becomes easier. Keep the knees slightly bent and allow the torso to lean forwards as the hips travel backwards. Practise eight to twelve repetitions before adding weight through a kettlebell or dumbbells.
A controlled split squat can also improve hip function. Place one foot in front of the other, lower vertically and keep the front foot fully supported. Allow the rear hip to extend naturally without forcing the pelvis forwards or creating discomfort in the lower back.
These exercises matter because posture correction must transfer into movement. Performing pelvic tilts on the floor may improve awareness, but daily activities require the hips and trunk to manage body weight. Progressive standing exercises create strength in more practical positions.
Step Six: Improve Upper-Body and Ribcage Position
The ribcage and pelvis work together during breathing and movement. When the lower ribs remain lifted, the lumbar spine may extend and the pelvis may appear to tilt farther forwards. Learning to bring the ribs into a comfortable position can reduce unnecessary lower-back tension.
Lie on your back with your feet against a wall or supported on a chair. Breathe in gently through your nose, allowing the sides and back of your ribcage to expand. Exhale slowly without forcing the stomach flat or pushing the lower back hard into the floor.
Thoracic mobility may also help when the upper back is stiff. Gentle rotations, open-book movements and supported upper-back extensions can make reaching overhead easier. Improved upper-back movement may reduce the need to compensate by excessively arching the lower back.
Breathing exercises are not a magical method for realigning the skeleton. Their value comes from reducing unnecessary bracing and improving awareness of the trunk. Combine them with strength, movement practice and ordinary physical activity for a more complete approach.
A Simple 15-Minute Anterior Pelvic Tilt Routine
Begin with one or two minutes of relaxed breathing and pelvic tilts. Perform eight to twelve slow pelvic movements while lying on your back, pausing briefly in the comfortable middle position. This prepares you to control the pelvis without beginning the session with aggressive stretching.
Next, complete two rounds of hip flexor stretches and glute bridges. Hold each hip stretch for twenty to thirty seconds and perform ten to fifteen bridges. Move slowly enough to notice whether the hips or lower back are producing the motion.
Follow with dead bugs and bodyweight split squats. Complete six to ten dead bugs on each side and eight to twelve split squats per leg. Rest when needed and reduce the range if you cannot maintain comfortable form or steady breathing.
Finish with a short walk or several hip-hinge repetitions. Complete the routine three or four times per week while remaining active on the other days. Consistency and gradual progression are more valuable than performing an exhausting correction routine once every few weeks.
How to Correct Anterior Pelvic Tilt While Standing
Do not try to squeeze your glutes and abdominal muscles continuously while standing. This strategy may temporarily reduce the appearance of the lower-back curve, but it can feel unnatural and become tiring. A comfortable standing posture should allow easy breathing and small position changes.
Instead, distribute your weight across both feet and allow the knees to remain relaxed rather than locked. Imagine stacking the ribcage comfortably over the pelvis without forcing either area into position. Shift, walk or change stance whenever you begin feeling stiff.
A gentle standing pelvic tilt drill may improve awareness. Slowly exaggerate the forward and backward pelvic positions, then settle around the middle. Practise for a few repetitions rather than attempting to hold the midpoint perfectly for hours.
Prolonged standing discomfort may reflect low activity tolerance rather than one incorrect posture. Gradually increase the time you spend walking, strengthening and standing. The body often becomes more comfortable by building capacity instead of searching for a single ideal alignment.
Sitting and Desk Habits That May Help
Sitting is not inherently damaging, but remaining in any one position for a long time can become uncomfortable. Adjust your chair so that your feet are supported and your hips and knees feel relaxed. Use the backrest rather than holding yourself rigidly upright throughout the day.
Change position regularly by leaning back, sitting forward or briefly standing. There is no need to maintain a strict ninety-degree posture at every joint. Movement variety reduces local fatigue and gives different tissues an opportunity to share the workload.
Take short activity breaks during long periods of computer work. Walk for a few minutes, perform several comfortable squats or move the pelvis forwards and backwards. Frequent brief movement may be more realistic than relying on one long stretching session at the end of the day.
A standing desk is not an automatic cure for anterior pelvic tilt. Alternating between sitting, standing and walking is usually more comfortable than replacing prolonged sitting with prolonged standing. Arrange the workspace around your body rather than forcing your body to fit an unsuitable setup.
How to Exercise in the Gym With Anterior Pelvic Tilt
You do not normally need to stop squatting, deadlifting or strength training because your pelvis tilts forwards. These movements can improve overall capacity when performed with appropriate technique and sensible loading. A visible lumbar curve is not automatically dangerous.
During squats and deadlifts, aim for a stable trunk without forcing the spine completely flat. Reduce the weight or range when your back position changes suddenly or the movement causes pain. Individual proportions influence technique, so everyone will not look identical.
During overhead presses, avoid finishing the movement by leaning excessively backwards. Lower the load, adjust your stance and keep the ribcage controlled as the arms move overhead. Limited shoulder or upper-back mobility may need attention when the lower back repeatedly compensates.
Progressive training should increase what your body can tolerate. Do not spend every gym session performing only corrective exercises with very light resistance. Once movement feels controlled, gradually strengthen squats, hinges, carries, presses and pulling movements.
How Long Does It Take to Improve Anterior Pelvic Tilt?
Movement awareness can improve within a few sessions. You may quickly become better at recognising when you are arching your lower back or tipping the pelvis forwards. Early improvement does not necessarily create an immediate visible change in relaxed standing posture.
Strength, mobility and activity tolerance usually require several weeks of consistent practice. Many people need six to twelve weeks to notice meaningful changes in exercise technique or discomfort. The exact timeline depends on training history, symptoms, consistency and the underlying reason for seeking help.
Structural anatomy will not change through ordinary stretching and strengthening. You may become stronger and more comfortable while still having a visible anterior tilt. This should not be considered failure when your movement, confidence and daily function have improved.
Avoid programmes promising complete correction in a few days. The body adapts gradually, and forcing rapid changes can create soreness or frustration. Measure progress through comfortable activity, improved exercise control and reduced symptoms rather than appearance alone.
Common Anterior Pelvic Tilt Mistakes
The first mistake is assuming that every lower-back problem is caused by pelvic tilt. Back pain has many possible contributors and often cannot be explained by one postural feature. Treating the wrong cause may delay more appropriate assessment or rehabilitation.
Another mistake is stretching the hip flexors repeatedly without strengthening the new range. Stretching may provide temporary relief, but the effect can fade quickly. Combine mobility work with bridges, split squats, hinges and other exercises that use the hips actively.
Constantly tucking the pelvis is also unhelpful. Posterior pelvic tilt is an exercise and movement option, not a posture that must be maintained all day. Overcorrection can flatten the lower back, restrict natural movement and create unnecessary glute or abdominal tension.
Progressing exercises too quickly can worsen symptoms. More repetitions, resistance and range should be added gradually. When an exercise consistently increases pain, modify it or obtain professional guidance rather than repeatedly forcing your body through the same movement.
When Should You See a Physiotherapist?
Consider seeing a physiotherapist when pain persists for several weeks, repeatedly returns or prevents normal activity. A professional can assess your hips, spine, strength and movement instead of diagnosing the issue from one standing photograph. Treatment can then target the activities that matter to you.
Assessment is also useful when you have a history of injury, surgery, pregnancy-related problems or significant side-to-side differences. A clinician can identify whether a structural condition, joint restriction or movement strategy needs a more individual approach.
Seek medical advice when pain is worsening, disturbs sleep, follows a significant injury or occurs with unexplained weight loss, fever or general illness. These features do not necessarily indicate a serious problem, but they should not be managed as a simple posture issue without assessment.
Obtain emergency care for new bladder or bowel problems, numbness around the genitals or buttocks, or severe weakness or numbness in both legs. These symptoms may indicate significant nerve compression and require urgent medical evaluation.
Final Verdict: How Do You Fix Anterior Pelvic Tilt?
Anterior pelvic tilt is often a normal variation and does not need correction when it causes no symptoms. A curved lower back or forward pelvic angle does not automatically mean that your muscles are damaged, imbalanced or weak. Appearance should not be the only reason for treatment.
When you have discomfort or poor movement control, begin with gentle pelvic-awareness exercises. Add progressive glute, core and leg strengthening while addressing genuine hip restrictions. Practise the new control during standing, walking, lifting and other relevant activities.
Avoid relying on one stretch, posture brace or corrective exercise. Sustainable improvement usually comes from a varied programme that builds strength, mobility and confidence. You do not have to hold the pelvis in a perfectly neutral position every moment of the day.
Track changes in pain, function and movement quality over several weeks. Seek a physiotherapist when symptoms persist or the correct approach remains unclear. The most useful outcome is a body that moves comfortably and tolerates daily life—not a pelvis that matches an idealised picture.
Frequently Asked Questions
Can anterior pelvic tilt be completely fixed?
Movement control and related discomfort can often improve with consistent exercise. However, natural bone structure and spinal shape may mean that some visible forward tilt remains.
What muscles should I strengthen for anterior pelvic tilt?
Glute, abdominal, hip and general trunk muscles can all be trained. Bridges, dead bugs, split squats, side planks and hip hinges are practical starting exercises.
Do tight hip flexors cause anterior pelvic tilt?
Hip tightness may contribute in some people, but it is not the only possible cause. Anatomy, movement habits and training patterns can also affect pelvic position.
Does sleeping position fix anterior pelvic tilt?
No sleeping position permanently corrects pelvic alignment. Choose a comfortable position that supports restful sleep and does not increase your back or hip symptoms.
Can walking help anterior pelvic tilt?
Walking supports general mobility and physical capacity, but it may not change pelvic posture by itself. Combine it with progressive strengthening and relevant mobility work.